
Advanced Flight


After many enjoyable hours learning the functions of your RC transmitter controls and feel of your model aircraft in the air, you are probably feeling ready to try some advanced maneuvers, also known as acrobatics. These are the intentional ones, not those you may have gone through unintentionally. (Like we all have.)
This Airfield Guide will provide you with a few tips you might find handy.
The first tip? Don’t go out and try advanced maneuvers at first. That is right, don’t go out and try them. Go in and try them. Use a flight similator.
Here’s a crash-consequence-free way to do exactly what the astronauts do before they go into space. Try it, before your actual model aircraft buys it.
Flight Simulators
You can “fly” using your own controller (in most cases) and a flight simulator software package on your computer. These programs are continually improving in authenticity and feel. This gives you a way to approximate flying your own model, but with zero real-world consequences. The real weather does not matter, daylight does not matter, time to go to the airfield does not matter and your experience does not matter. And most of all, crashes do not matter.
You select weather, terrain, the plane you fly and the airfield.
Fun Fact: When you crash on a good simulator program, you are not done. Just hit the reset button and start over.
“The real weather does not matter, daylight does not matter, time to go to the airfield does not matter and your experience does not matter (on a simulator).”

RF9 works with VR, can be bought with or without a controller and may work with your existing transmitter.
This is not a review, so we are going to keep it simple by mentioning perhaps the best known software, RealFlight9. You will notice at the Amazon link that you can buy the software alone or with the controller. Your controller may be compatible, reducing the cost and improving your ability to experience acrobatics using own controller. If you can use your own controller, not only will you save, but your experience will translate better into the real world.
HINT: Connectors and adapters are available separately for use with the InterLink DX that will make it compatible with the trainer jacks on most Futaba®, Tactic® and all JR®, Spektrum® and Tower Hobbies® systems.
Supported Aircraft
One thing to ponder is whether your aircraft is available in the simulator choices. Here is an example list from the manufacturer, which can change with new versions and updates.
E-flite Viper 70mm EDF with AS3X® and SAFE Select Technology
E-flite Havoc Xe 80mm EDF with AS3X and SAFE Select Technology
E-flite Extra 300 3D 1.3m with AS3X and SAFE Select Technology
Buddy Box
Being able to connect your controller with that of an experienced RC pilot will allow her to help you out by taking over with the linked transmitter (just requires a cord if both units are designed work in this mode) until danger has passed. Sometimes it helps, and sometimes nature just takes its course. So don’t be upset if a crash occurs even with your best efforts to avoid one. It is all part of the game.
Working with a mentor is one of the best ways to enjoy the hobby, and make great friends who can share the excitement with you. You get their advice, and they get to relive the fun of their early flights while sharing their expertise.
Advanced Flight, or Acrobatics 101
Part of the mix in deciding which basic acrobatics you can do depends on your controller. Our recommendation has been to start with a simple 3-channel controller. However, without aileron control, as an example, you will not be doing rolls.
To begin, make sure you have several stories of altitude. Your friend is plenty of space to recover in. Go higher than you would normally fly, but not so high you cannot see most of the plane control surfaces and be able to judge what you are doing.
The Standard Loop
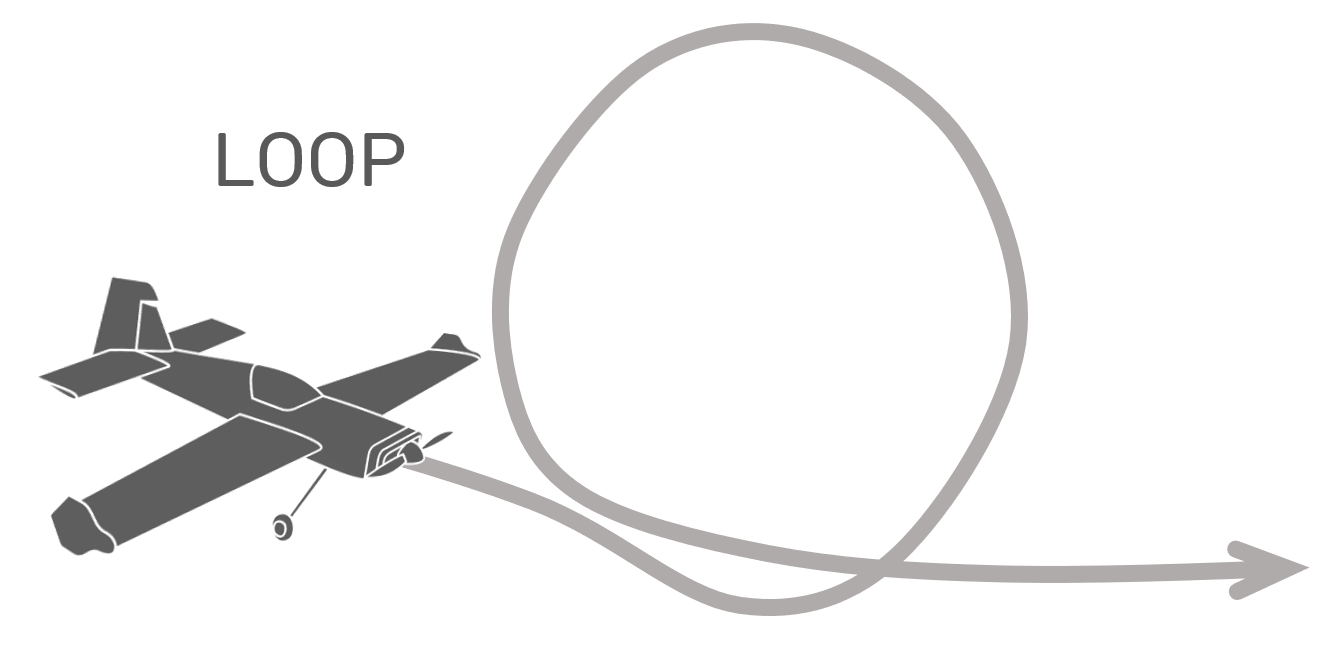
The standard loop.
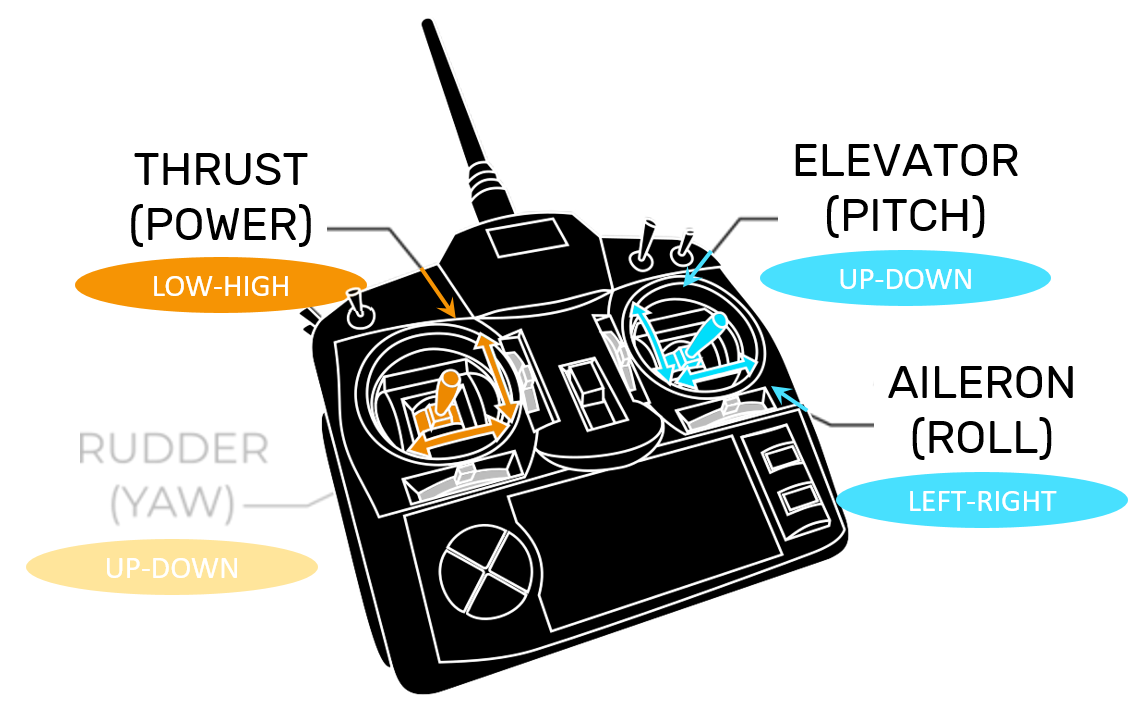
Controller in Mode 2.
A loop is an “O” shape where your aircraft enters the O near the bottom, follows the shape around and exits again at the bottom going in the same direction it was originally.
Your plane will probably do a loop if you can control what all 3-channel transmitters control:
Throttle
Rudder
Elevator
After arriving at your crusing altitude, point the plane into the wind. You will want to be at crusing speed, or about half throttle. Trainers are designed for stable flight, so you may have to push them a bit to get the desired acrobatic result. In this case to increase speed as you make your loop attempt, you will want to nose down a bit and increase throttle as much as another quarter forward.
Once you have gained some speed, gently pull back on the elevator. This is going to cause the nose to head up, and the energy from the speed needs to carry the plane up and into an inverted position at the apex of the circle.
At the top of the loop, the plane will have slowed as energy has dissipated. At that moment, decrease both throttle and elevator sticks (move them toward you) and hold those settings until you get back to the point of the O at which you entered.
At the bottom of the loop, slightly increase your throttle and push your elevator stick forward to move the plane back into level, stable flight. The amount of pressure needed on both sticks will depend on the energy and position of the plane. Depending on speed, you may not need as much throttle, for example. If the angle coming into the bottom of the loop is shallow, you may not need much elevator to level out.
HINT: Did we remember to remind you to leave a lot of open space between your plane and the ground should you need to recover?

Problem Scenarios
A common problem encountered during the loop is stalling out on the upward swing. Not enough energy. The plane may swing out to one side and down or simply plunge backward and then downward.
Relax. Throttle back.
Observe. Assess what the plane decides to do. A training plane wants to seek level flight after the unusual forces applied drain out.
Make minor adjustments that your earlier experience tells you will help the wings become level. You can worry about direction after stable flight.
Correct course. Reorient the plane within the virtual box you were flying and regain altitude.
If the plane rolls right or left coming down from the top of the loop, use modest rudder adjustments to correct.
HINT: Excessive throttle to gain speed combined with gravity on the way down can stress an airframe. Use just the speed you need as you learn to loop.
Upside Down or Inverted Flight
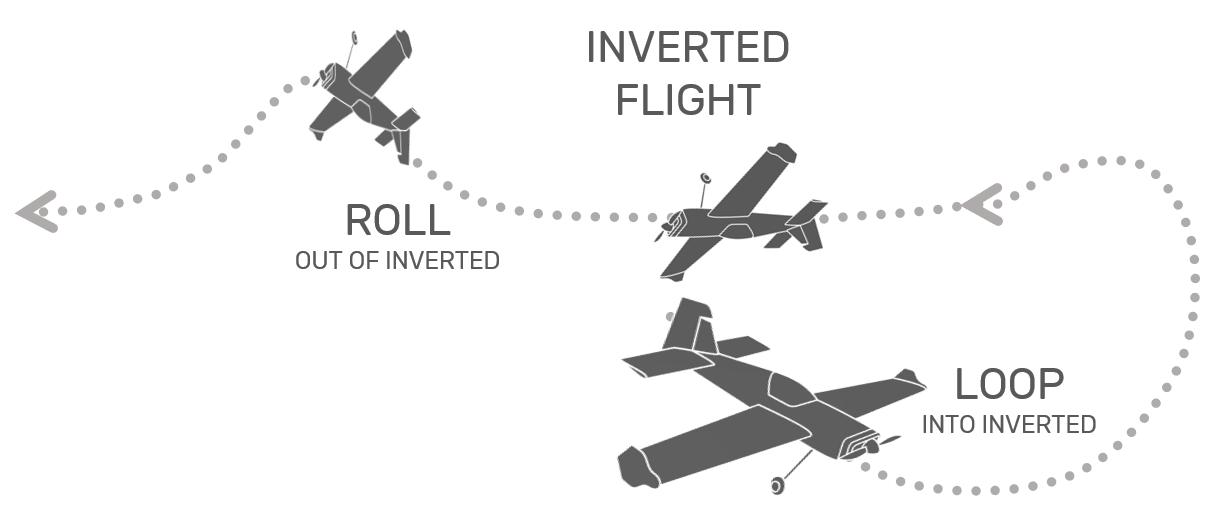
Into and out of inverted flight.
Flying upside down is just what it implies. Rolling upside down and remining inverted until you are ready to continue the rest of the roll to level, normal flight.
Once inverted, flight is similar to normal flight, although the plane will have slightly different characteristics (after all the tail and cockpit canopy are now down and the landing gear is now up), and elevator and rudder controls will be the opposite of what you are used to. So, all that time you spent training your muscles and brain? Well inverted flight challenges those habits.
A loop is often used to enter inverted flight. That method will be described, here. However we mentioned the roll first, because it is easier to exit inverted flight by rolling. Unfortunately, the roll maneuver requires aileron control which 3-channel transmitters are not often used for. This is why entering from a loop is described. If you have four channels, it will be easier to enter inverted flight from a loop but exit by rolling out. Rolls are described in the next segment after this maneuver.

When your aircraft is inverted, rudder and elevator are the opposite of what you have learned. Push forward on the elevator to lift the nose before applying throttle. Once the nose is headed up, provide more power to make the climb back to level flight.
Enter Inverted Flight from the Top of a Loop
The prior segment describes making loops. As before, gain altitude so you have plenty of room for recovery. The change comes at the top of the loop. Instead of letting more energy drop off, simply back off just a little on the throttle (as you would have before) and give a thumb width of forward pressure on the elevator (instead of backward pressure as in the full loop).
Those actions should move the elevator down and flip the nose of the plane out into level inverted flight. Getting into inverted flight from a loop is mostly a matter of timing. If you miss it, you have plenty of altitude to recover. Follow the problem steps above if you need to, regain altitude and try again.
Getting out of inverted flight using a loop can be a little more tricky. That is because, since your aircraft is upside down, elevator and rudder controls will perform the opposite of what you are expecting. So, instead of going up to end your inverted flight, you may end up in a deep downward angle. If you relax, you will usually be able to recover. Again, if you have an option that controls ailerons, rolling out of inverted flight is easier.
So, to loop out of upside down, you want to loop up. Push forward on the elevator (which will seem counterintuitive by now) and when the nose begins to move up, increase throttle to about two thirds. If you throttle up before the nose has turned upward, you may start that downward swoop mentioned.
At the top of the loop you are now making, the plane will be almost in level flight again. At that point, pull the elevator about a thumb with toward you to bring the nose up. A little throttle may be needed.
With adequate height, you can enter inverted flight from a loop and exit that way as well. Keep your altitude up, because this is a tricky maneuver. And, again, if you have aileron control, then use a roll to exit.
Additional Practice
You will probably also want to learn to control the rudder, which again operates the opposite of what you expect in upside down flight, so you can practice inverted circles in both directions.
Once you get the feel for going into and coming out of inverted flight, try combining different acrobatic maneuvers and repeating them until you become smoother. It is fun to draw a diagram of the pattern you would like to learn and use it at the airfield.
Always be ready to accept the inevitability of a crash. You are then just in a different phase of the hobby until your repairs are completed.
“If you have four channels, it will be easier to enter inverted flight from a loop but exit by rolling out.”
The Standard AXIAL Roll

A roll is a corkscrew shaped aerobatic maneuver where the plane rotates on its roll axis and spins on its fuselage 360 degrees while moving forward. It exits the roll to return to level flight.
Although a 3-channel transmitter can be set up to control ailerons instead of the rudder, for rolls you probably need to be using a 4-channel transmitter. Therefore, this maneuver is last, because we recommend three channels for learning.
Your plane must have ailerons to do a roll. Here is how that is accomplished after gaining altitude and directing it into the wind. The plane should also be flying across your field of vision or away from you, but not toward you.
Pitch the nose ever so slightly up with the elevators. Use about 65% throttle - models will vary in what input they need to do this maneuver.
Start a bank with about 65% right ailerons. The torque of the motor will make it easier to bank the opposite direction the motor shaft and propellers are turning. Most motors turn clockwise as you look at the plane from in front of it. So right turns would be easier, and we recommend trying that direction first as you learn.
The slight pitch up when you started was to counteract a tendency for the plane to pitch down a little as it rolls. When the plane has rolled about 270 degrees, or through 75% of the turn, you should neutralize controls. By the time the plane has rolled about 305 degrees, or through 85% of the turn you should be counteracting the original bank with moderate left ailerons to stop the roll at level flight. When the wings are level again, neutralize controls. You will probably be angled (pitched) slightly downward and need to use a little down elevator to flatten out.
